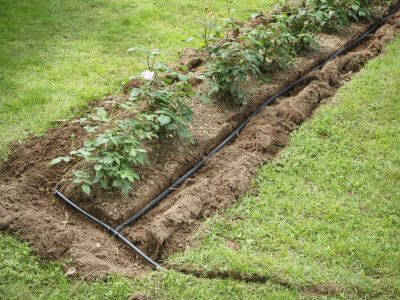
Drip Irrigation Installation
Drip or micro-irrigation is an irrigation method that applies water slowly to individual plants. Drip systems are fairly easy to set up yourself and require four easy steps: laying out the irrigation grid, assembling the hoses, installing tees, and then installing emitters and feed lines. When installing a drip irrigation system, the first thing to do is lay out a grid with the hoses so you can get an idea of how far apart they need to be. Each hose gets an emitter that is attached to plastic tubing that runs from the main hose to the plants. Emitters should be a foot apart (30.5 cm.) in sandy soil, 18 inches (45.5 cm.) apart in loamy, and 24 inches (61 cm.) in clay soils. To keep groundwater from backing up into your tap water, install a backflow preventer valve. Also, attach a hose adapter to fit the diameter of the hose. Connect the main line to the backflow preventer and run it to the garden. Punch holes according to the above lengths in the line and place the emitters in position. Plug the ends of the lines with caps and band clamps. That’s how to install drip irrigation, and it’s really quite simple to do yourself.
How to Install Garden Irrigation Sprinkler System
If you want to put in irrigation to cover the entire landscape including turf, installing an irrigation system gets a bit more complex. First, you need a schematic of the landscape. You can either draw one yourself or have a pro do it. Include trees and other obstacles. Check your water pressure by attaching a pressure gauge to the outdoor faucet. Then remove the gauge and fill an empty 5-gallon (19 L.) bucket using the faucet. Time how long it takes for the bucket to fill and then calculate the flow rate in gallons per minute. This will tell you what type of sprinkler heads you will need. Be sure to look at coverage options (spray pattern) as you choose. Using your map, plot the course of the irrigation system using as few turns as possible. Extra turns reduce the water pressure. For large areas, use multiple loops instead of a single stretch. Mark the placement of the sprinkler heads on your map making sure to allow a bit of overlap to ensure the radius of each head covers the full area. Using spray paint or flags, mark the location of the system in your yard or garden. Assemble the zone valve based on the number of loops you have incorporated in your irrigation installation. Consult the instructions to ensure the valves are facing the correct way. The valve assembly will connect to a timer and pipes that connect to each valve. Now it’s time to dig. Dig trenches that are deep enough that the sprinkler heads will be flush with the ground. Also, dig an area near the water faucet for the zone valve assembly. Lay the pipe or hoses for the system and install the sprinkler heads according to your plant. Shut both the water and power off to your home if you want to connect the faucet and connecting pipe to the valve assembly. Install an external control box for the irrigation system. If necessary, run a wire from the breaker box. Connect the valve assembly to the faucet and then connect the valve wires to the control box. Turn on the power and water and test the irrigation system. Backfill the trenches with soil once you have confirmed there are no leaks. Install a cover over the valve assembly. Full DIY sprinkler system installation is not as simple as installing drip lines, but it can be done and is a real cost saver.
